When working with LEDs, knowing "how to calculate the resistor value for an LED" is crucial. Resistors protect LEDs from excessive current. Too much current can damage the LED, leading to failure. Understanding this process is key to achieving optimal performance in your projects.
Calculating the right resistor value involves basic principles of electricity. You'll need to know the LED's forward voltage and desired current. These parameters guide your calculations. Many people overlook the importance of precise values, which can lead to unexpected results.
Practical experiments can reveal discrepancies in calculations. Sometimes, the LED might not light up as expected. Testing different resistor values encourages learning from mistakes. It’s all part of the journey in electronics. Gaining this knowledge enhances both understanding and skills in the field.
Understanding how LEDs and resistors work is key for any electronics enthusiast. LEDs, or light-emitting diodes, require specific voltage and current to function properly. Too much current can damage them. This is where resistors come into play. They limit the flow of current to the LED, ensuring it operates safely.
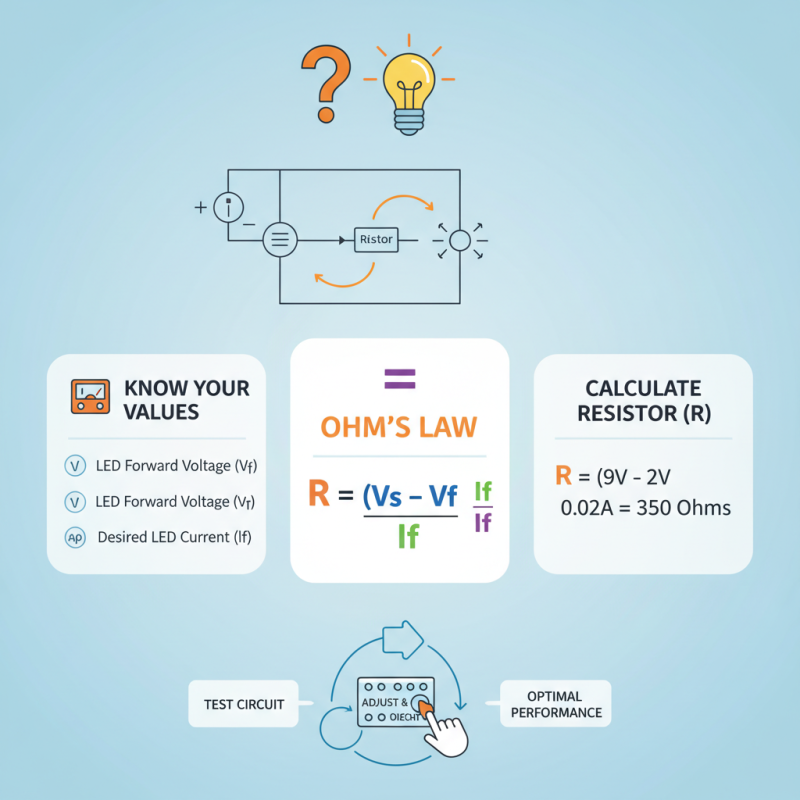
When calculating the resistor value for an LED, you'll need to know the supply voltage, the LED's forward voltage, and its desired current. The formula is quite straightforward: subtract the LED forward voltage from the supply voltage, and then divide that result by the desired current. It's essential to get these values right. An incorrect resistor can lead to an overly bright LED or, worse, a burnt-out component.
It’s easy to overlook the tolerances in these calculations. Small errors can lead to significant differences in brightness or longevity. Experimenting with different resistor values can yield fascinating insights. A higher resistor may reduce brightness but could extend LED life. Remember, understanding these fundamentals helps create better, safer projects.
| Parameter | Value | Unit |
|---|---|---|
| Forward Voltage (Vf) | 2.2 | Volts |
| Supply Voltage (Vs) | 5 | Volts |
| Desired Current (I) | 20 | mA |
| Resistor Value (R) | 140 | Ohms |
| Power Rating of Resistor (P) | 0.28 | Watts |
Determining the supply voltage for your LED circuit is crucial. This voltage ensures that your LED operates efficiently and safely. Begin by identifying the operating voltage of the LED. Most standard LEDs operate at around 2V to 3.5V. This information dictates the voltage needed from your power supply.
Next, consider the type of power supply you plan to use. Batteries typically deliver a consistent voltage. For example, a 9V battery is commonly used in various applications. You must take into account any voltage drop on the circuit as well. If using a 9V battery with a 2V LED, the difference in voltage must be managed correctly.
Additionally, reflect on the total current your circuit will require. This can affect your power supply choice. Too much current can damage your LED, while too little may not light it effectively. Voltage and current assessments must align to ensure proper operation. Gathering all this information helps you create a functional and reliable LED circuit.
When working with LEDs, understanding their forward voltage and current specifications is essential. The forward voltage is the voltage drop across the LED when it operates. This value varies depending on the LED's color and type. For instance, red LEDs typically have a forward voltage of about 1.8 to 2.2 volts, while blue and white LEDs can be around 3.0 to 3.5 volts. Knowing this helps ensure you supply the correct voltage to function properly.
Next, consider the current rating for the LED. Most standard LEDs operate at 20 milliamperes (mA), but some can tolerate higher currents. Refer to the LED datasheet for exact values. If the current exceeds the specification, it may burn out quickly. Always double-check the manufacturer's guidelines for accuracy. Making a mistake here could lead to disappointing results, as an undervalued or overvalued LED can distort brightness or jeopardize functionality.
While it's relatively straightforward, keep in mind that resistant calculations can sometimes lead to errors. Ensuring accurate measurements and double-checking connections is crucial. A focus on precision will yield better outcomes in circuits involving LEDs. Remember, even small changes in voltage or current can impact performance significantly.
This chart displays the calculated resistor values necessary for five different LEDs based on their forward voltage and current specifications, ensuring optimal performance and longevity.
Calculating the required resistor value for an LED is straightforward with Ohm's Law. This law states that voltage (V) equals current (I) times resistance (R). For LEDs, you need to know the LED's forward voltage (Vf) and the desired current (If). Generally, most common LEDs operate at about 20 mA or 0.02 A.
Here's a simple formula: R = (Vs - Vf) / If. In this formula, Vs represents the supply voltage. Suppose you have a 9V battery and an LED with a forward voltage of 2V. If you want 20mA of current through the LED, you'd plug the values into the formula. This means R = (9V - 2V) / 0.02A, which calculates to 350 ohms.
Tip: Always choose the nearest standard resistor value to avoid excess current that can damage the LED.
Keep in mind, precision matters. Depending on the power source, slight variations can occur. Check the actual voltage from the battery; a full charge might differ from nominal values.
Tip: Use tools like multimeters to measure voltage across the LED in your circuit to ensure its accuracy. This helps in refining your resistor value. Balancing between brightness and longevity is critical. Finding the perfect resistor can take a few tries.
When selecting the appropriate resistor rating for an LED circuit, understanding the LED specifications is crucial. Each LED has a forward voltage and a recommended current, typically around 20 mA for standard diodes. Using these values, you can calculate the right resistor. The formula involves subtracting the LED voltage from the power supply voltage. The result is then divided by the LED's current.
Consider tolerances while choosing resistors. A resistor's tolerance indicates how much its actual resistance can vary from its stated value. Common tolerances are 5% or 10%. A higher tolerance might lead to unexpected brightness in your LED, which could shorten its lifespan. Sometimes, it’s better to err on a lower resistance value, as it reduces current and can prolong LED life.
Keep in mind, heat may also be a concern with resistors. If they become too hot, it can lead to failure. Always check the power rating; a 1/4 watt resistor is commonly used, but in high-power applications, a 1/2 watt or higher may be necessary. Test various resistor values to see what works best with your setup. Experimentation often leads to the best results, even if it means making mistakes along the way.
: Forward voltage is the voltage drop across the LED when it operates. It differs by LED color and type.
Red LEDs have about 1.8 to 2.2 volts. Blue and white LEDs range from 3.0 to 3.5 volts.
Most standard LEDs operate at about 20 milliamperes (mA). Some may handle more, but check the datasheet.
Exceeding the specified current may cause the LED to burn out quickly, leading to poor performance.
Use Ohm's Law: R = (Vs - Vf) / If, where Vs is the supply voltage and Vf is the forward voltage.
Always pick the nearest standard resistor value to prevent excess current that could damage the LED.
Small changes in voltage or current can significantly impact performance, so accurate measurements are vital.
Use a multimeter to check the voltage; it's crucial for refining the resistor value in your circuit.
It may distort brightness or jeopardize functionality, potentially leading to disappointing results.
Mistakes in calculations or connections can lead to errors. Always double-check your work for better outcomes.
In the article "How to Calculate Resistor Value for LED in Simple Steps," readers are guided through the essential concepts of LED operation and resistor functionality. It begins by explaining the importance of understanding the supply voltage in the LED circuit, followed by how to identify the forward voltage and current specifications for the particular LED being used.
The heart of the article focuses on how to calculate the resistor value for an LED using Ohm's Law, ensuring that the LED operates safely and efficiently without risking damage. Furthermore, it discusses selecting the appropriate resistor rating and tolerance to maintain circuit reliability. This structured approach enables readers to confidently design their LED circuits, emphasizing the critical role of the resistor in preventing excess current.
Zever Light