When tackling the question of "How to wire multiple LEDs in series vs parallel," expertise is crucial. Lighting expert John Smith once stated, "Proper wiring can significantly enhance your LED setup's efficiency and lifespan." This highlights the importance of understanding the differences in wiring methods.
Wiring LEDs in series means connecting them one after another. Each LED shares the same current, making this approach efficient for certain applications. However, a single LED failure can darken the entire chain. On the other hand, wiring in parallel allows each LED to operate independently. This design improves reliability, but it requires careful attention to voltage specifications.
Understanding these principles can lead to better lighting solutions. Yet, many hobbyists make common mistakes. Overloading the circuit or incorrect voltage can damage components. Reflecting on these learning moments can deepen knowledge. Experimenting with wiring methods can bring practical insights. Ultimately, mastering "how to wire multiple LEDs in series vs parallel" requires practice and patience.
Wiring multiple LEDs can seem daunting. Understanding the basics is crucial. LEDs can be wired in series or parallel. Each method has unique advantages and challenges. In series wiring, the current flows through each LED sequentially. This creates a consistent brightness but requires careful voltage management. A higher total voltage is necessary, which may lead to complications.
Parallel wiring, on the other hand, allows each LED to connect to the same voltage source. This method simplifies brightness control. However, if one LED fails, it can affect the others. Some may wire too many LEDs in parallel without considering the current limits, leading to potential overloads. Proper resistor selection is essential to ensure longevity.
Fluctuations in LED performance can be a common issue. Some might notice uneven brightness across LEDs. This inconsistency often results from poor wiring practices. It's vital to double-check connections and to use matched LEDs for better results. Small mistakes can lead to bigger problems over time. Educating yourself on these basic principles can greatly enhance your LED project outcomes.
This chart compares the basic electrical characteristics of LEDs when wired in series versus parallel configurations. Series wiring presents a higher total voltage drop but lower current draw, while parallel wiring allows for increased current yet may lead to greater power consumption.
When deciding between series and parallel configurations for wiring multiple LEDs, understanding their pros and cons is crucial. In a series configuration, the total voltage increases with each LED added. The current remains constant, which can lead to a more straightforward setup and reduced wiring complexity. However, if one LED fails, the entire string goes dark. This lack of redundancy can be a significant downside in critical applications.
On the other hand, parallel configurations allow each LED to draw the same voltage, maintaining brightness if one fails. This setup often requires larger current sources, which can lead to overheating. Industry studies indicate that while series circuits can be efficient with fewer connections, they are less reliable in scenarios demanding high availability. A report from the IEEE highlighted that 70% of failures in LED systems occur in series setups due to single-point failure risks.
Balancing these options requires careful consideration of the specific application and desired outcomes. For example, an outdoor lighting system might prioritize redundancy and therefore lean towards parallel configurations. Alternatively, a decorative display might benefit from the simplicity of a series connection. Each choice forms an essential part of the LED design process, urging engineers to reflect on their priorities and risk tolerance.
When wiring LEDs in series, calculating the right resistor value is crucial. The voltage drop across each LED can vary, but typically it's between 2.0 to 3.5 volts. Always refer to the LED datasheet for accurate values. For example, if you connect three 2.2V LEDs in series to a 9V power source, you will need to calculate the total forward voltage. This totals approximately 6.6V. The remaining voltage drop of 2.4V must be handled by a current-limiting resistor.
Use Ohm's Law (V=IR) to determine resistor values. If the desired current is 20mA, the resistor value can be calculated as follows: R = V/I = 2.4V / 0.02A = 120 ohms. Select a resistor with a higher standard value, such as 130 ohms. This small adjustment ensures the LED's safety and longevity.
When working with multiple LEDs, consider these tips. Position your LEDs carefully for balanced brightness. Inspect connections regularly to prevent short circuits. Additionally, experiment safely. Test different resistor values and LED arrangements for better outcomes. This hands-on approach promotes learning, even if results may not meet expectations initially.
When wiring multiple LEDs, safety must be a top priority. The first consideration is to avoid overloading the power supply. Excessive current can lead to overheating and potential fire hazards. Use a multimeter to measure voltage and ensure it matches the LED specifications. This simple step can prevent many problems.
In addition, proper insulation is critical. Exposed wires can cause short circuits. Always use heat shrink tubing or electrical tape to cover connections. Check for any frayed wires before starting. Poor connections can create sparks or other dangerous situations. Remember, every connection should be secure. Loose wires can lead to intermittent issues.
Lastly, consider using resistors to balance the current across LEDs. Without them, one LED might draw more current than others. This may result in uneven brightness or even damage. It's an important aspect to reflect on as you plan your wiring. Keep these safety measures in mind for a successful LED project.
Wiring LEDs can be straightforward, but issues often arise. Understanding common problems helps in troubleshooting efficiently. One frequent issue is uneven brightness. This usually occurs when LEDs are wired in parallel. The solution lies in using a current-limiting resistor for each LED. Each LED should have its own resistor, ensuring they all receive the same voltage.
Another common problem is wiring LEDs in series and exceeding the rated voltage. When the total voltage surpasses what the LEDs can handle, they can burn out. To avoid this, check the specifications carefully. Use an appropriate power supply that matches the voltage requirement of your series configuration.
Lastly, pay attention to polarity. Connecting LEDs the wrong way will prevent them from lighting up. Always identify the anode and cathode before making connections. If you realize the LEDs aren't lighting up, double-check your wiring to ensure polarity is correct. Small mistakes can lead to larger issues, but they are fixable. Reflecting on these points can lead to more effective LED setups.
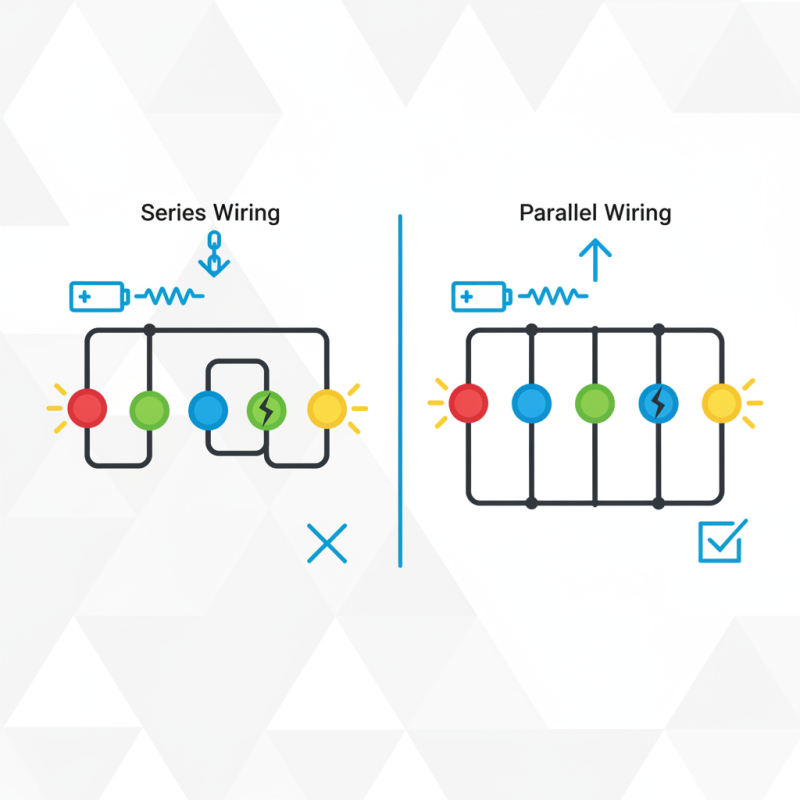
: LEDs can be wired in series or parallel, each having its pros and cons.
In series wiring, current passes through each LED in order, creating consistent brightness.
A single LED failure in series can cause the whole setup to stop working.
Parallel wiring allows each LED to connect to the same voltage source, simplifying control.
If one LED fails, it can affect the performance of the others in the circuit.
Proper resistor selection ensures the longevity of the LEDs and prevents overloads.
Uneven brightness is often caused by poor wiring practices or mismatched LEDs.
Small mistakes in connections can lead to bigger problems in LED performance over time.
The choice between series and parallel depends on the project’s requirements and desired reliability.
Engineers should consider priorities, application type, and acceptable risk levels during design.
When learning how to wire multiple LEDs in series vs parallel, it's essential to understand the key differences and implications of each configuration. Series wiring connects LEDs end-to-end, requiring a single current to flow through all units, which can simplify wiring but may lead to issues if one LED fails. Conversely, parallel wiring allows each LED to operate independently, providing more reliability but necessitating careful consideration of resistor values to prevent uneven current distribution.
It's also vital to consider safety precautions, such as ensuring appropriate resistor calculations to prevent excess voltage from damaging the LEDs. Additionally, troubleshooting common problems, such as flickering or unequal brightness, is essential for achieving optimal performance. By following these tips and understanding your wiring options, you can successfully implement multiple LEDs in your projects while maximizing both functionality and safety.
Zever Light